

I’ve loved these Deco Mesh wreaths from the moment I first saw them in one of the local shops here, but I couldn’t bring myself to fork over the money for one.
The Deco Mesh wreaths around here go for somewhere between $80 – $400.
Holy Moly.
I just can’t do it. I can’t pay that much!
I would feel guilty and my husband would probably disown me haha But since I love to be crafty and could spend my entire paycheck in Hobby Lobby (could, not would lol) I figured that I could figure out this whole “Deco Mesh Wreath” process and make my own for a fraction of the price.
If I can get everything on sale, I can normally make one of these for somewhere between $20 and $35. Just depending on how much “stuff” I add to it.
Really, it’s the little “add ons” that jack the price up on these. However, I’ve been stocking up on stuff from the Dollar Tree for my wreaths! I hit the jackpot for Halloween stuff there!
Let’s move on though! I’m going to show you how I made my new Halloween Deco Mesh Wreath!
Which I’m totally IN LOVE with! haha. I’m also obsessed with making these now so I’m pretty sure that there will be more Deco Mesh Tutorials on here soon!
I have also broken this post down into two sections.
PART 1 – Will show you how to make a “Work Wreath” (Click HERE)
PART 2 – Will show you how I make the Deco Mesh Wreath (BELOW)
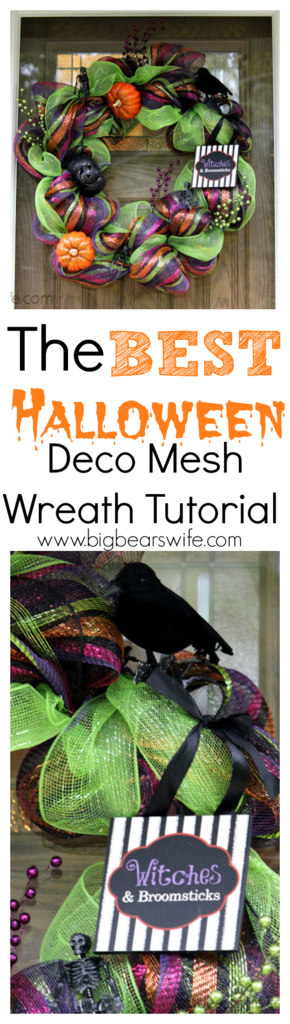
Halloween Deco Mesh Wreath Tutorial
For the Halloween Wreath
What I used:

1 Work Wreath Form (22 or 24 inch), store bought or homemade (click here to learn how to make one)
20 – Pipe Cleaners (for the wreath from ^)
1 ( 21″ x 10 yards) Metallic Halloween Colored Deco Mesh Roll – From Hobby Lobby
1 (5 1/2″) Apple Green Metallic Deco Mesh Ribbon Roll – From Hobby Lobby
1 black glitter pumpkin (Jack O’ Lantern face on the other side) – Lights up – From Dollar Tree
“Witches and Broomstick” sign – From a local Shop called The GingerBread House
Green and Purple shimmery floral picks – from the Christmas Section of Hobby Lobby
1 – Black Crow/Raven – From Dollar Tree
2- Glitter Pumpkin picks – Thanksgiving Day section of Hobby Lobby
1 set of Mini Plastic Skeletons – From Dollar Tree
(Green tube ribbon – optional, I thought I would use it but didn’t – it comes from the floral section of Hobby Lobby)
**You’ll also need a glue gun**

First, you’ll need to make a Work Wreath Form (unless you’ve bought one pre-made). I have a tutorial on making that here.

Done! Ok, now it’s time to start making the wreath!

Lay out all of your “add-ons”. Here are a few that I picked out for my wreath. I love this black glitter pumpkin!
I got it from the Dollar Tree and was originally going to use it as just a black pumpkin because I didn’t like the face that was carved onto the other side. (That’s why it’s facing this way in the photos).
But it turns out that the pumpkin light inside actually changes colors and looks really neat so I decided to turn it around on the finished wreath.

These green and purple shimmery floral picks match perfectly with my Deco mesh ribbon! I found them over in the Christmas section of Hobby Lobby! I love to look over there for picks even if I’m not making a “Christmas” wreath because there is so much to choose from. I’ve gotten things for the Halloween wreath and a Fall wreath from the Christmas section!

This little Raven/Crow came from the Dollar Tree. I had originally seen one like this at a local shop (that sells these Deco Mesh Wreaths) for $10. I really, really wanted him for my wreath but couldn’t pay $10 for a fake bird. BUT then, I found this little guy at the Dollar Store. SOLD! 🙂

These glitter pumpkins were hiding in the Thanksgiving day section of Hobby Lobby.

And these little Skeletons were in the Halloween section of the Dollar Tree. I think they’re suppose to be Halloween “garland” but I cut the rope off and just used them individuality on the wreath.

So let’s get started! I hope that I can explain this well! 🙂
Start with your work wreath on a flat surface.

Un wrap the large tube of deco mesh and gather the end . Take the end of the deco mesh and place it into the center of one of the inside pipe cleaners.

Twist the pipe cleaner around the mesh to hold it in place.

I place my deco mesh off to the side and just unroll as I go.

Move down the deco mesh a few inches and bunch it together again.

Secure onto the next section of the wire wreath with a pipe cleaner twist. (Work along the inner circle first)

Continue this pattern.

Gather the deco mesh.

Bunch it together, go to the next pipe cleaner twist, place the deco mesh in between the pipe cleaners and twist them to hold the deco mesh in place.

I hope that the photos are giving you a good idea on how to do this.

Up close! Place deco mesh “bunch” into the center of the pipecleaner.

Twist to secure.

Continue around the wreath.

Working ONLY on the inner circle!

Once you’ve completed the entire inner circle and get back to the starting point, start with the pipe cleaners directly above the “starting point” pipe cleaner.

Now do the same process around the outer circle, making sure to bunch and twist deco mesh into each pipe cleaner. Fluffy the deco mesh as you go.

An entire roll of deco mesh will cover the inside and outside areas of the wreath. When you run out of Deco Mesh, twist the last bit into the last pipe cleaner.

The base color is complete!

Next, take your second, small roll of deco mesh ribbon.

Starting on the inner circle, add the green deco mesh into one of the pipe cleaner. Twist to hold.

Just as your did with the base color, work around the wreath with the green.

Bunching some together, moving to the next pipe cleaner, placing the deco mesh and then twisting to secure it. Do this for the inner and outer circles just like the base color.

Now your wreath base is finished, but you’ll still have all of the crazy pipe cleaners sticking out everywhere!

Flip the wreath over so that you can see the wire base.

Working your way around the wreath, pull the pipe cleaners around and to the back of the wreath.

Twist them onto the wire base.

This will create a clean look as well as help pull the deco mesh towards the center of the wreath!

Looks much better!

Now flip your wreath over and fluff the deco mesh!

You’re ready to add things onto the wreath!
I use a glue gun and hot glue smaller items onto my wreath. for larger/heavier items, I hot glue a pipe cleaner to the back of these items, push it onto the wreath and then secure it by twisting the pipe cleaner around the base through the deco mesh.
I normally hang my deco mesh wreath up for this part. I place all of the picks where I think they should go and gently set the other items into “pockets” in the wreath. I also use items to cover up some of the places where the pipe cleaners or wire wreath can still be seen.
Arrange everything BEFORE gluing them down haha. I normally have to arrange things and step back quite a few times before I’m happy with everything. Once I’m happy with the way it looks, I’ll go around the wreath and hot glue everything into place!
This is my finished wreath!
I love it so much!

My Raven and Witches sign!

Those glitter pumpkins have floral picks on them so I could just put hot glue on the bottom and the stick and stick it into the wreath.

For the sign, I hot glued a 2 inch section of the middle of a pipe cleaner along the back of the sign and then used the edges of the pipe cleaners to twist it onto the wreath base through the deco mesh

The little skeletons only needed a drop of hot glue.

oooo Spooky!

hey little guy!

OOOO and there is my glowing pumpkin! The one I almost didn’t use the “face side” of! But I’m glad I did. He’s an awesome $1.00 pumpkin haha!
See… he glows different colors!!

I hope that the directions weren’t confusing! It’s easier to show than to tell haha. If you have any questions please feel free to e-mail me!
This is just a hobby for me so I KNOW that don’t do it as well as the professional wreath makers, but this is how I do it so, this is the way that works for me! Have any tips for me? How do you make them?
Happy Haunting! Check out all of the spooky Halloween recipes and crafts on this website!!
![]()
*There may be some Amazon affiliate links in this post. Which means if you buy something from one of my affiliate link it goes into helping me pay for what it cost to run this blog 🙂
I’m linking too Tidy Mom’s I’m Loving it Friday!
So cute! I’m definitely making one! I’ve made a few with grapevine and attaching things with garbage ties too. At Christmas I bum as much tree trimmings from the Christmas tree lot will fit in my car and then stick them in grapevine wreaths And wrap with ribbon too.
Carroll Shaw. [email protected]. purchased but know where to find on my phone. $2.99. Help please
Hi Carroll! I e-mailed you 🙂
Thank you so, so much! You have saved me from losing face & breaking a promise with my Daughters! I ended up sticking my foot in my mouth telling about the wreaths I had bought everything to make, and ended up having each wanting one, which leaves a 3rd I cant leave out…for obvious reasons, Lol. I arrived home to realize I needed a LOT morebmesh, etc. I went shopping for more mesh, & yes my pocket book cant afford more than Dollartree, I went to my Oakdale store , sold out, next town same then a third, (rural towns 15 min. apart max) nothing left & only the 4th of October?
It’s now 11:30pm fretting I Googled “deco-mesh wreaths made cheaper with less materials.
Your site was the second listed and your description gave me hope!
Your wreath is gorgeous and the mesh amount is a third what the instructions on the DT’s mesh instructions! Your pictures are clear & instructions easy to understand. I now have hope, you saved the Holiday & I will have beautiful wreaths for all my girls! Thank you for all your hard work to bring this to others! Sincerly, Ellen C. Jones
Oh Ellen, I’m so happy to hear that you liked the tutorial! I hope you have lots of success making the wreaths! I’d love to see them when you’re done!
you did a wonderful job. it looks great. I am 75 years old and retired.Got bored and decided to make some wreaths.I’m not selling them but I give them to my friends and family.I love what you made.
Thank you, Aleta!!
Thank you, Soo much, for ur easy and visual instructions! I have to go over instructions,several times,, for it to click in my brain. But I need a lot of visual and urs are great! Thank you, so much!
So glad that you liked the tutorial! I’m the same way! Plus I need lots of directions and photos haha
I love it! I think a fun craft like that would be good for me. Something that I could finish quickly and have a cool wreath to show for it! I’m not very crafty, but you make it look easy.
What a fantastic tutorial….great job! You make it completely doable…so thank you. Beautiful wreath, looking forward to more wreath tutorials.
Wow, you just saved a lot of people a ton of money with this fab wreath tutorial! I love that orange and purple one! These are so much fun and could be great for sports teams too. What a fantastic craft idea!
xo ~kim & chloe
This is great! It doesn’t seem as hard as I thought it would be, and I’m with you on Hobby Lobby! I rarely do any crafts, but just going in there makes me want to buy stuff. I have an entire stash of “project materials” (don’t tell my husband, lol).
This was a wonderful tutorial Angie. You make everything so easy to understand. I can’t wait to try making one. Thanks for sharing your creativity 🙂
Renee – Kudos Kitchen
This was a fabulous tutorial Angie! Very concise and easy to follow! I was just drooling over a black one at Michael’s last week that was marked down to $29.95 from $49.95! Now I can make my own! Thanks –
Great tutorial! Easy to understand! Cant wait to go buy my stuff tonight and make one.
Angie, Thank you SO much for this amazing tutorial. I TOTALLY copied you and ran straight to Dollar tree and scored the black pumpkin and the skeletons (no bird though- no biggie!) . Anyways, I don’t have hobby lobby in my neck of the woods so I had to use the selection that Michael’s crafts had to offer. My wreath looks very similar to yours (because you are incredibly creative and I loved your ideas!) I hope you don’t mind! I am so inspired I can not wait for the next holiday! Like you, I saw these wreaths but couldn’t stomach the prices- I am so happy you shared your method with us! Awesome job!
YAY! Of course I don’t mind that you copied it! 🙂 So glad you loved it!
Awesome tutorial! Easy to follow. I’ve made a deco wreath before but not using more than one color so was not sure how to do. Love how you did the walk through with the pipe cleaners, that makes it so much easier than doing one at a time. Great! Thanks so much, off to do my Halloween wreath, it’s Oct after all! Yikes! Already!
Fantastic tutorial! I have had the deco mesh for a month, but didn’t know how to make the wreath. Thank you, thank you, thank you!
a perfect tutorial! you made it seem so simple. Can’t wait to try this out!
Could you tell me approx how far a roll of the mesh goes? Does it take a whole roll to make a wreath? Great tutorial!
Yes, I use a whole roll for the wreath. I suppose that you could use less but it won’t look as full
Thanks! That way I know how to “pace” myself with it! Can’t wait to give it a try!
Just made mine!!!! Love it!!! Thank you!!!
Love love love the wreath – can you tell me how big your wreath form is you use?
I think it’s a 22 inch or 24 inch Wire wreath.
Great tutorial thank u!!
How do you hang the wreath?
Wreath hanger..or could you use ribbon to make a loop possibly?
I bought a suction cup wreath hanger from Hobby Lobby to hang mine on my glass door, just hooked the wire wreath onto the hook, but you could certainly tie a ribbon onto the wire to make a loop for hanging.
This is an amazing tutorial!!! Going out tomorrow to make me a Crimson Tide wreath!!! I keep seeing one I want but it’s 90.00 and I just can’t justify it. LOL!
Absolutely loved your tutorial. You eplained the directions so clearly and easy to follow. I am going to attempt my first wreath real soon. Thank you!!
I am going to make my very first mesh wreath. I am so glad you made this. I sure will reference it. Thank you!!
I made a Charger themed one with blue mesh and gold wire ribbon.
Thanks to your tutorials, I have made a wreath for fall and working on the Christmas wreath
Gorgeous!! We’re thinking of having a class to make these as a fundraiser for a club at school. I appreciate you teaching the secret how to’s! Thanks!
Love your work..you have inspired me!
This was a GREAT tutorial! Very detailed and I am so ready to go get the supplies to make one!!!
Great tutorial!! Thanks for breaking it down into little steps. The wreath looks awesome!!
I used your tutorial to make my first wreath (Christmas.) It turned out absolutely beautifully! Thank you so much!!
Had just left Hobby Lobby w/ photos of their fabulous fall wreaths, complete w/ pxs, inc price tags…even w/ 50% off these wreaths cost $100+!!!!…They are probably larger than what I need, but figured I could make my own…pull from my old decorarations and I did buy a few new pieces…I even have.some bits of burlap, so knew I could make one myself…Decided to “goggle” for tips and found your tutorial…Wow!!…You are my kinda gal!…by far the best!…and yes, I love Dollar Tree shopping…going back to Hobby Lobby for burlap ribbon as that is going to simplify things and may try floral wire instead of pipe cleaners…will try to wire some of the add ons…many thanks and props to you!
I am going to make my first wreath.You make it look so simple.Thanks so much
ANGIE–that was so cute, concise and to the point!!! Have u seen the Xmas tree made from the wire form? I saw it in a book yesterday @ the giant store and all I can say is how did we make it in life without smart phones! Now I have to figure out how to put the pipe cleaners on the form….I refused to buy the book! ?
Have u done the candy cane one yet? Costco has mesh 2 rolls for under $7 but very limited selection yesterday. It was the long/wide stuff. Basically twice as much as the BIG STORE sale prices!
I have done the candy cane one! I’ll be sharing that soon! 🙂 I haven’t seen the Christmas Tree, I’ll have to look that up! I normally use a 40% off coupon at hobby lobby for my deco mesh so that it’s around mmm $8 per roll? Wish we had a Costco!
just typed a long post and now can’t get it up here for some reason! I worked out the tree form last nite. It took me awhile to figure out the whole deal but I’m a very visual person so once I got the hang of it I was good to go! 🙂 Basically the form is 3-D but you want to use it FLAT…I was a little confused on that issue too cause it can be done different ways. It takes 13 pipe cleaners to make the attachments and you want to run one thru each of the points where the metal connects to another piece of metal to make it stay flat. I have a couple pics I can post if need be. Like I said initially a tad confusing but got it worked out without too much hassle.
Am now a devotee of the Dollar Stores! Found some way cool stuff to use for other things inc some baby “fobs” for a wreath for a co-worker’s door when she has her first baby in early March!
Thanks again and keep posting!
I would love to see some pictures!
I love the Dollar Store for Wreath stuff too!
If anyone has a Sams Club in their town, they sell the large rolls of deco mesh for $4.99 a roll. And they had about 8-10 different colors/styles to choose from. Great post!
That’s an awesome price! I’m going to have to check and see if Our sams has any!!
Thank you for this tutorial! You made it super easy and i LOVE my wreaths!
Thank you for sharing looked at videos on youtube and couldn’t understand them you have made this a lot simpler for me. Can’t wait to get my supplies this week!
I’m so happy I found your blog! I love the wreath I made! Couldn’t have done it without you! Thanks 🙂
Wow!! Thanks for the wonderful tutorial. I have been wanting to try one of these and saw a book on making them but it was $25. I love the wreaths that you have made and cannot wait to try one myself. Saw the mesh is on sale at Walmart for $7.99 so that seems to be a decent price. Looking forward to seeing your candycane version. Thanks again.
Ty for making this simple the pictures are great much better than the videos I have found.
Hi I’m from India and making a wreath for the first time! Thanks a bunch for the tutorial. ..you broke down each step beautifully. . 🙂
Omg I love this!!! Your tutorial is sooo easy to follow!!! I couldn’t find anything on Pinterest to make a wreath form so I went on Google. So glad I found your page!!! I love that you take several pictures of the steps and do close up ones too so that I can see exactly how it’s supposed to look. I will definitely be following your page!!
Thanx for the tutorial on Mesh wreaths, I just bought some rolls of mesh ribbon in Walmart, on clearance, paid $1.99 a roll when normally $7.88. ( love xmas clearance) 🙂 I bought red, green, gold and a green/purpleish one. I plan on making one for Valentine’s day, St. Paddy’s day and Mardi Gras. Have to buy and make the wreath base first, but can’t wait to get started! I found your blog through a Google search, and I am so glad I did 🙂
I’m so glad you found my blog too! Hope the wreaths turn out wonderfully!
there is a mardi gras wreath on pinterest that is awesome, I’m going to make it next year…it is to die for!
OMG.. Love the tutorial I found on Pinterest and can not wait to get started on my own. Your instructions were so easy and so helpful and you are using lightweight material. Thanks Thanks Thanks…
Thank you! I’m so glad that you like the tutorial!
Angie, Your instructions are ah-mazing! Happy wreath making! 🙂
Again, thank you so much! I actually made a yellow mesh one for spring…I was really disappointed because the wreath form was showing..but I didn’t do two layers…and everyone still raved about it…I was so lost and I wanted to make them soooo much..thank you, thank you, thank you
This is great! Thank you for showing it step by step!!! I’m going to the store now! =)
Wow your instructions on how to make these are sooo easy to see and understand. Other sites are not so easy to follow. THANK YOU very much for taking the time to do this. Im gonna attempt my first Wreath very soon.
I have been searching for easy instructions and was unable to find them until I came to your site!! Thank you, thank you, THANK YOU!!!! Your step by step pictures and instructions are perfect!! I can’t wait to start my first wreath!!
I just finished reading your instructions and was thinking the same thing as the previous writer. Your instructions are fabulous.THANK YOU! I have been looking at these wreaths sold on ebay and want one so bad but would not spend that much on one wreath. LOVE your halloween wreath. You have great taste and creativity.
LOVE the wreath and what a great tutorial – how sweet of you to share !!
THANK YOU SO MUCH for your tutorials! The start up wreath base and the deco mesh one. I appreciate it. I have admired these and wanted to try making one. Your pictures and step by step are great. The pictures of your ‘hobby wreaths’ are fabulous. And a fraction of the cost I am sure. Thank you for taking the time to post them.
Needed a boost of confidece, your tutorial was the simplest and best! I made a very pretty Easter wreath with your help, thank you. And yes with all the bargains and store coupon apps you can really outdo yourself! Debbie
I’ve looked at several tutorials, and your’s is the best I’ve seen! Thank you for being so thorough yet simple! Very helpful!
Awesome tutorial. thanks!
Thank you for this wonderful tutorial! (It is the best one I have found, too.) So funny; you used the same striped mesh I have been wanting for a Halloween wreath, and since I found your tutorial I feel confident making it. 😀
Angie a big THANK YOU! Just made my first one yesterday. It needs LOTS of revamping. However I am determined:) God Bless!
Thank you for the tutorial. I just made my very first curly spiral type back to school apple wreath. I can’t wait to make one for halloween,xmas, july 4th etc. Went to michaels craft store and picked up a roll of red mesh, used a 50% off coupon and got it for $4.99 and found some clearance rolls for .69 and .99. I used other things i had on hand to make it so the the entire wreath cost me $6.25!! Thanks again and have a blessed day!!
I’m very artistic but I need to see how it’s done sometimes…… I CAN NOTHING YOU ENOUGH FOR posting. I’m sooooo excited and I can’t wait to go and buy the materials! Have you seen how much people are charging on Etsy for these wreaths?
Thanks so much for the instructions. I’ve tried other strategies before and ended up with a jumbled mess. I will be making wreaths for all of the upcoming holidays.
made a 24 inch base wreath last night but wondering how the deco mesh amounts change if i skip down to the 16inch bases available where i live. the 24inch wreath is just too big for me to store more than one seasonal one. Any input or advice about this??
Can’t wait to start my new project
I love your Tutorial. I have’t made one yet. I’m going to try and I need a step by step guide. I am very much into the Victorian look. I know mesh wreaths aren’t Victorian but I have yet to see something like burlap and lace. I don’t know anything about the wreaths, just that I love them ;). I guess what I’m asking is, would that be something that would look right? Thank’s again for your tutorial.
If you google pictures of mesh wreaths you’ll find some that are more victorian. I am making one for my sister on a twig wreath, with hydreangeas and burlap ribbon and a big wood letter….it’s the little extras (ribbon, embellishments etc) that make it. Good luck!
Your tutorial was easy to follow! I have made two! One for fall and one for Halloween. Thank you for the steps by steps! I am sure my sister n laws will beg me to make for them….:)
Thank you so much for the step by step instructions! I’ve been trying to find just this. Can’t wait to give it a try. Yours are beautiful!
IM trying to learn how to make these wreaths but my puffs come out to big. I want it to look fuller. I’m not very crafty though. Yours are beautiful
This is THE BEST Deco Wreath How To that I have seen on the web! Thank you so much for putting this together!
Wonderful tutorial, thank you so much for providing the pictures and details! What a great idea to ‘prestage’ the wreath form with the pipe cleaners, that makes it so much quicker to put the mesh on!
Thank you so much. This really is the best tutorial I have seen and I have watched videos, read blogs you name it..I couldn’t figure out what I was doing wrong. I have the exact same patterned second mesh you do but couldn’t really see the pattern but did see LOTS of the wreath form behind it. I finally figured out I was OVER fluffing ! I redid mine three times before I realized where I went wrong…thank you again!!
SO great! Can’t wait to try! Thank you!
I have been making the deco mesh wreaths for an upcoming craft fair. They look so full but when I hold them up I can see through them, is that normal? You can’t see the wreath form when hung up or on a table, but when I am holding it I can.
I find that light colored mesh shows the wire frame a lot and that darker colors of deco mesh hide it better. But yes, sometimes I can see my wire when just holding it up but not once I hang it.
I just finished my first wreath (Halloween) and it came out just gorgeous! I didn’t notice the size of wreath frame recommended when I read the instructions and purchased an 18″. I was going to exchange it, but compared the size to my current wreath and it is the perfect size for my front door and made the ribbon so full with very few bare spots that needed covered with decorations. Thank you for posting this tutorial. I am looking forward to creating my Christmas wreath!
Great tutorial! You gave excellent details and the pics are a great help. I bought all my supplies yesterday and hope to get up the courage to try and put it all together tomorrow. I will have your tutorial right by my side as I work on my wreath. Thanks again and I will be looking forward to your Candy Cane wreath!
awesome instructions! Can’t wait to try. Regarding the wire frame showing thru, I have read that some people spray paint it to match the mesh.
That’s a great idea!
After watching many tutorials and reading directions thank you, thank you, yours made the most sense and was the easiest to follow. Thanks!!!
I love it. I’m for sure going to Hobby Lobby tomorrow. Thank you!
Just made a gorgeous Christmas wreath for my son and his family. Used your tutorial. Thanks so much!
This was great and the wreath turned out beautiful! Thank you for sharing.
Thanks for the great step by step–got my stuff & made one tonite! so easy & fun!!
This is the best tutorial have seen! Thanks for sharing
First ones I made were for breast cancer awareness, pink and white with pink ribbons glued on from Dollar Discount.
Awesome tutorial! The best one I have seen. Thank you for sharing.
Thank you so much for this tutorial! I made a wreath as a Christmas present. It turned out lovely!
Great tutorial! Thank you for making this to share. God bless you!
Nice Tutorial! I know you took a lot of time with the pictures but they are super helpful and I’m glad you did! I’m addicted to wreath pictures on Pinterest but perhaps I’ll actually make one soon! Thanks for taking the time you did on this post!
Thank you so much! I’m so glad that you like it!
Found your tutorial many months ago but never made one. Found Christmas colored mesh wreth at 90% off. Bought red and white striped for Valentines and silver and green for St. Pat’s Day, and pink and purple for Easter. Your directions are spot on and I love making my own wreaths!
This is great. Thanks for providing the tutorial as well. I also would like to make a wreath and this is going to help me a lot. I have already got the decoration material like meshes, ribbons etc. from http://www.papermart.com/HOME. With your tutorial help I am soon going to make a wreath.
Thanks so much for your clear and inspiring directions. I will be trying this shortly. Can’t wait to get started!
So glad that you could use them. Let me know how it all goes!
Hi Angie, I have made several wreaths myself not only because of the cost but they are so much fun to get together & make everyone buys what they like & there’s always enough to share. I went through your instructions & there were still things I learned from you. Thank you so much for your very easy to understand instructions, your wreaths are beautiful. Keep up the great work & enjoy 🙂
Thank you!!
Angie, I have been all over many websites looking at the tutorials for making these wreaths, and I can honestly say, “you have the best one”. Your instructions and pictures are just down to earth, simple and so easy to follow. Like all the other people commenting, “Thank you” so much for doing this for the rest of us. God Bless you and your family.
Your directions are very clear and the pictures are great. I can’t wait to start on my wreaths for our front door and the front peak of our house.
Thank you! I hope the tutorial helps!!
Thank you for the detailed pictures. I tried to do this on my own and it didn’t turn out. I think your pictures will really help me.
You’re so welcome! Let me know how it turns out!
Excellent directions–am making a wreath for my niece for Christmas in the “Nightmare before Christmas” theme as that is what she wants–hope she likes when I am through!!
I love the Nightmare before Christmas!!” I made a Nightmare before Christmas themed one last year and I love it so much. I hope yours turns out great!
Thanks so much for sharing your tutorial. I found it extremely helpful and your directions very easy to follow. My first wreath is a Frozen wreath for my granddaughter’s third birthday, then I want to make a Halloween and a fall wreath. This is so much easier than I thought it would be, and I, too, do not want to spend $100 on something that I can make for a fraction of the cost and with so little trouble.
Thank you! DD is marrying on Halloween and I want to make a wreath or two for her wedding.
This is lovely and your directions were very simple and easy to follow. Thank you, and keep up your creations!!
Thought your tutorial was awesome and easy to follow. Did grapevine wreaths but never a deco mesh one. Thanks to you I can’t wait to make my first one!!
Angie! Yours is the first tutorial I have seen that makes previous confusing words very clear! Even the Burlap or Mesh wreaths made by pulling the mesh “ribbon,” etc., through the wire openings one row after another (without being tied) are understandable to me! I had just not been able to “wrap my head around” their words or picture it in my mind, but now I can “see” that method, too! Yours is easier, I think, and uses less mesh, perhaps …
You are so generous to share your creativity and knowledge with your readers. As you can tell, we are all most appreciative! Thanks so much!
Hi Kathleen!!
I’m so glad that you liked the tutorial! I found a lot of the tutorials before hard to understand when I was teaching myself how to make them so I thought there needed to be an easy to follow one out there 🙂
Thanks for the great tutorial. Really easy to follow your instructions and turn my dollar store finds into an adorable wreath.
So glad that you liked the tutorial!!
Awesome tutorial. You did great. I could understand and follow right along. You explained it perfectly!!!! Thanks for sharing. Your wreath is beautiful!!!!!
Thank you!! I’m so glad that you liked it!!
Thank you for posting and being so detailed cant wait to try!
Can’t wait to see what you make! I’d love to see a photo when you’re done!
That is really nice of you to post the instructions on making the wreath.. Very easy to understand. Your wreath is so cute, Thank you again.
you’re very welcome!!
Angie THANK YOU for being Soooo Detailed with all of the instructions. Awesome Tutorial!! You explained it PERFECTLY and made it Very easy to FOLLOW. The Pictures was so helpful. This is one of the BEST wreath making tutorial I HAVE SEEN thus far.
Thank you! I’m so glad that you liked it!
Thank you for the great tutorial. I love making these wreaths. I have not made one in this style but my new Halloween is going this way.
So glad that you like it! Let me know how the wreath turns out!
The wreath was beautiful , i would like to know how to keep the pipe cleaners from moving once they are put on the wreath
Hi Brenda, You could always hot glue them once you twist on or twist them into the middle connector part them BUT I like for them to move so that I can fluff the wreath and rearrange things as needed as I’m working on it.
Also, Thank you! Glad you liked the wreath!
YOU ARE ONE AWESOME LADY YOU DONE THE DIRECTIONS SO I COULD UNDERSTAND IT PERFECT THANKS SO MUCH
You’re so welcome!!! I’m so glad you liked it!
Thank you for showing how to make this fun and beautiful wreath. You are one-fantastic instructor!!
Thank you so much!! Great tutorial!! I’m planning on making one now that I know how
Hope you love making it!!
What an ingenious wreath!
Thank you!!
Wowie Loved the color combination of the wreath. looks classy. i wish i could make one
This is beautiful and your instructions are great! Thanks for sharing your talent!
I wanted to say that I enjoyed your tutorial very much. I can not think of one thing in your directions that I would change. I believe they were easy to follow for just about anyone. It turned out great by the way.
I am a DT shopper and I have about 30 6″ mesh ribbons. Can I use them to make these types of wreaths? All I ever see is 10″ or larger. Please help. I hope I haven’t waisted money on ribbon too short to be used for wreaths.
Hi Stephany, You can use it. On the bigger wreath forms it may just take more ribbon. I use 5 1/2 inch mesh ribbons for my mini wreaths. You can see that here: https://www.bigbearswife.com/mini-christmas-deco-mesh-wreath-tutorial/
I have been making the deco mesh for years & now I’m having a senior moment and forget how to do the puffs. One Quick question is how big do you make the puffs & how far apart do you place them. I made one for my sister -in -laws, birthday yesterday, she love it, but I wasn’t happy with the way the puffs turned out. You wreath look amazing. You did a a very good make such a beautiful wreath, I look better than some of the ones on ESTY
Hi Louie! I just kind of make them about 4 or 5 inches, just depends on how it looks to be honest haha. But thank you for the compliments!
Beautiful wreath. Your directions are good. Will try to make one.