
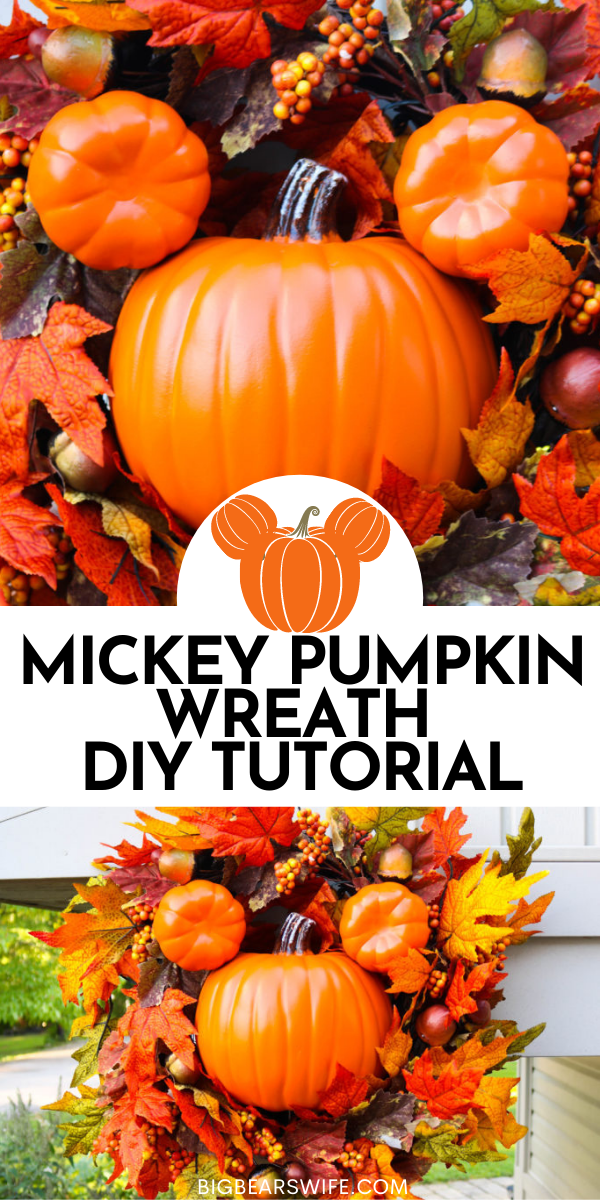

If you’re crazy about the big Mickey wreaths that the Disney Parks decorate with you’re going to love this Mickey Pumpkin Wreath DIY Tutorial! Now you can decorate your own home with a little Disney magic!
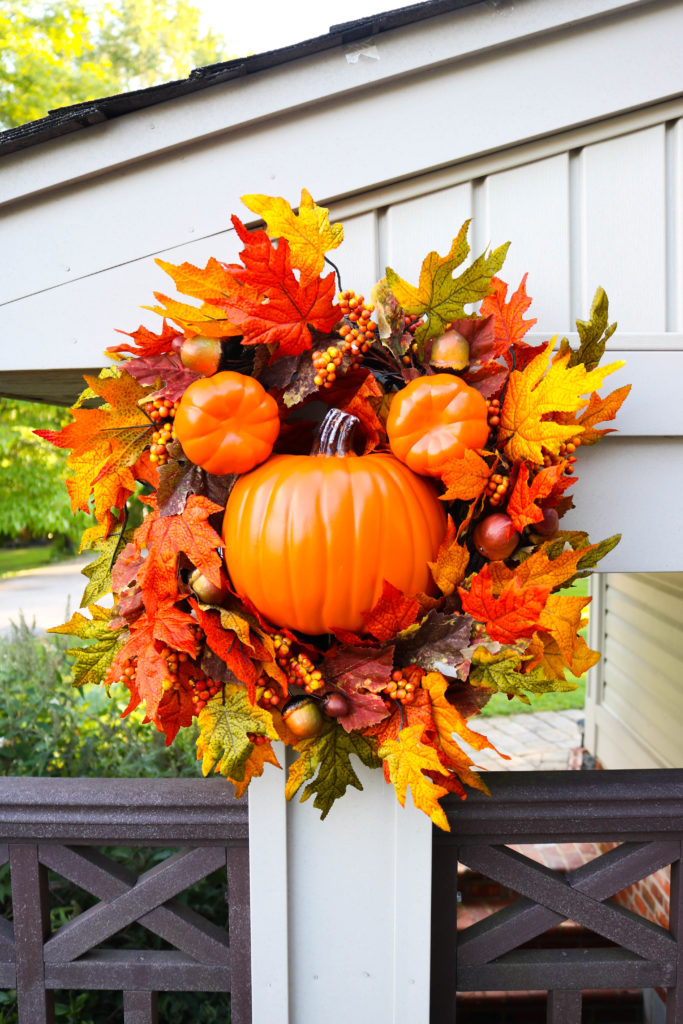
It’s here! Finally, the Mickey Pumpkin Wreath DIY Tutorial is on the blog and I can’t wait for you to use this fun tutorial to make your very own Mickey Pumpkin Wreath!
I started making these Mickey Pumpkin Wreaths earlier this year for my son’s 1st birthday party and when I posted a photo on Facebook everyone seemed to go crazy over them! Some people even asked me if I’d be willing to make some to sell.
While I’m still tossing around the idea of making them to sell, I wanted to share with you how I made them so you can make one too!
I fell in love with the Mickey Pumpkin Wreath when we were at Disney for Halloween the year for before little J was born. So when we decided to do a Mickey Pumpkin themed party for his first birthday I knew that I wanted to have Mickey Pumpkin Wreaths at the party.
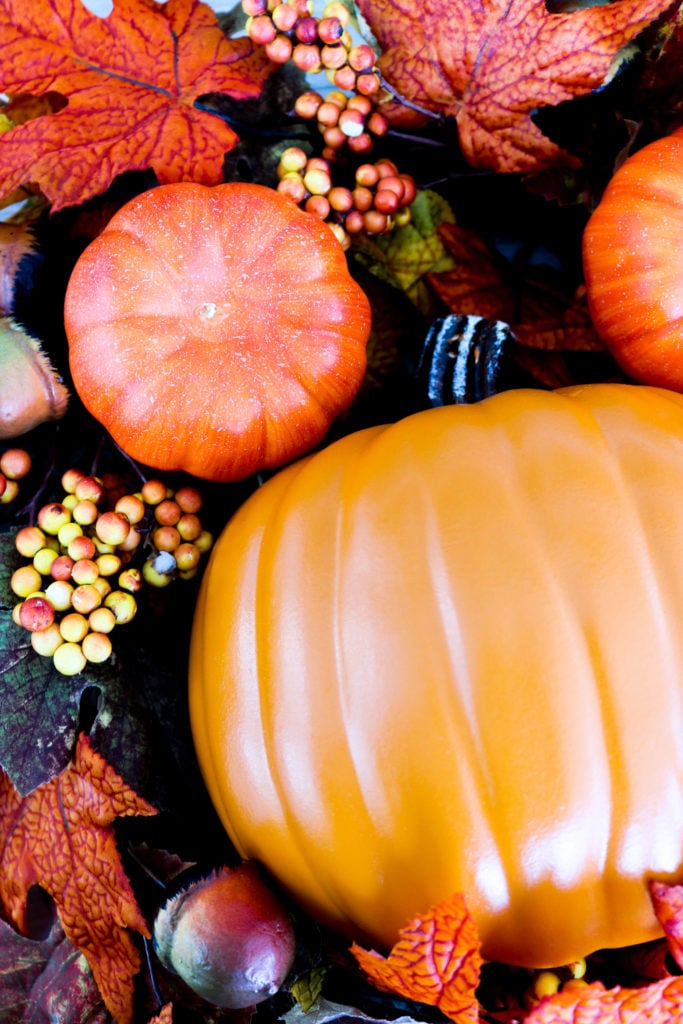
I also made little mini Mickey pumpkins to decorate with too!
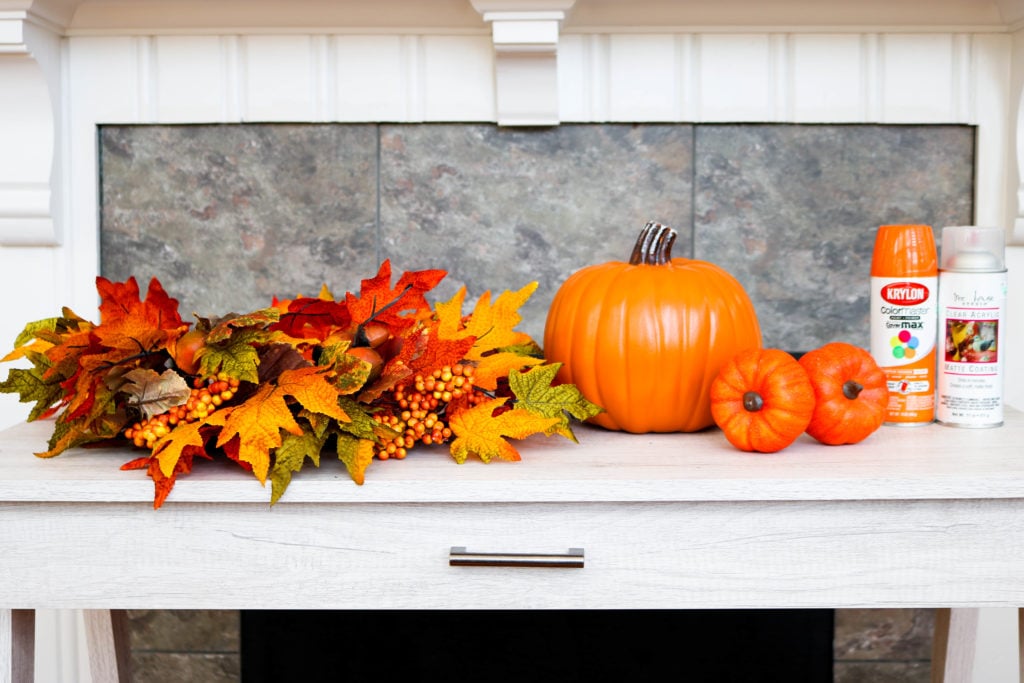
Here is what you’ll need:
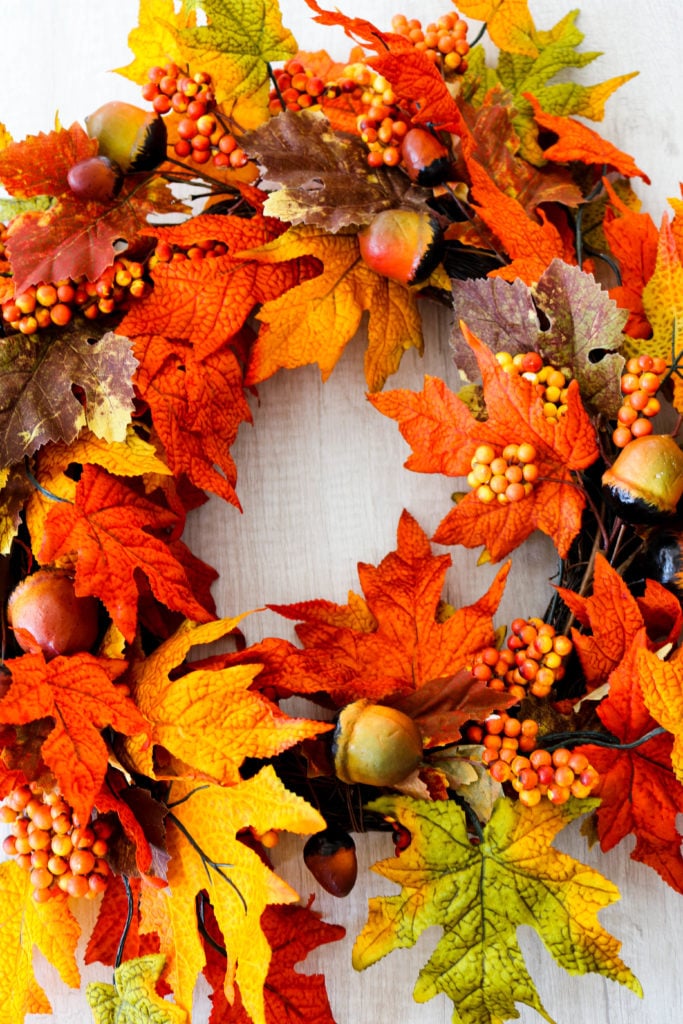
- 1 fall wreath – homemade or store-bought*
- 1 large/medium foam carvable pumpkin
- 2 small foam pumpkins
- Orange spray paint
- Clear acrylic fishing spray
- wire coat rack or some type of wire to secure the pumpkins in the back
- knife
- two small pieces of foil
- hot glue gun and glue (optional)
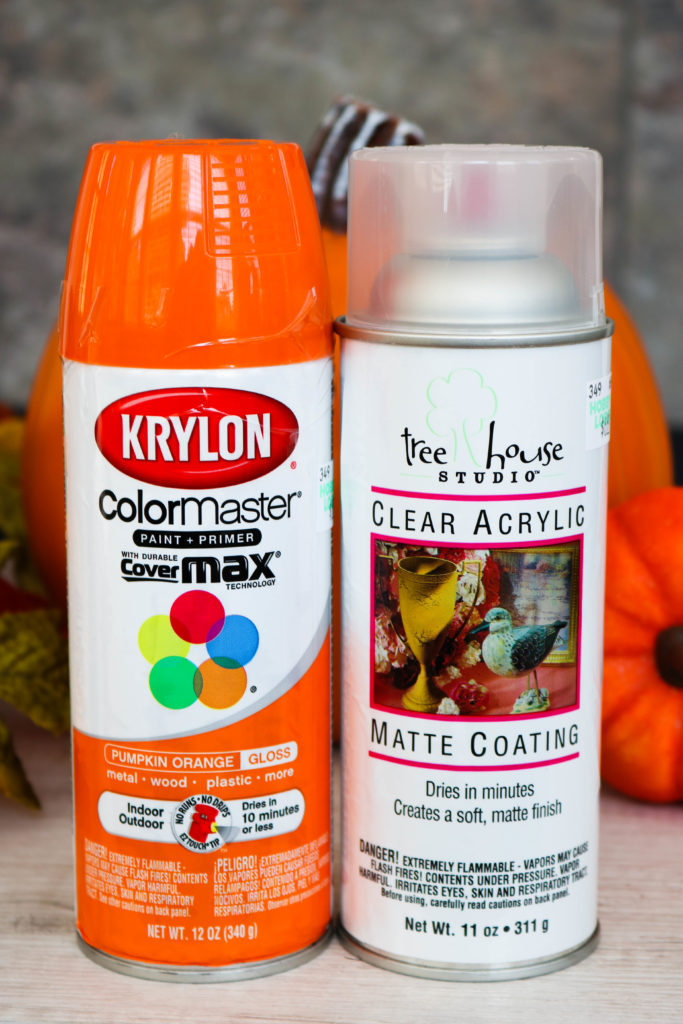
These are the two paints that we used for this Mickey Pumpkin Wreath DIY Tutorial. You can, of course, use a darker or lighter orange, this is just what we went with.
Pumpkin Orange
Also, if you’re not going to hang the wreaths outside you might not need the clear coating but I didn’t want to chance it.
So let’s start with the pumpkins for this Mickey wreath.

For the main Mickey head, I used this foam carvable pumpkin that I bought at Hobby Lobby.
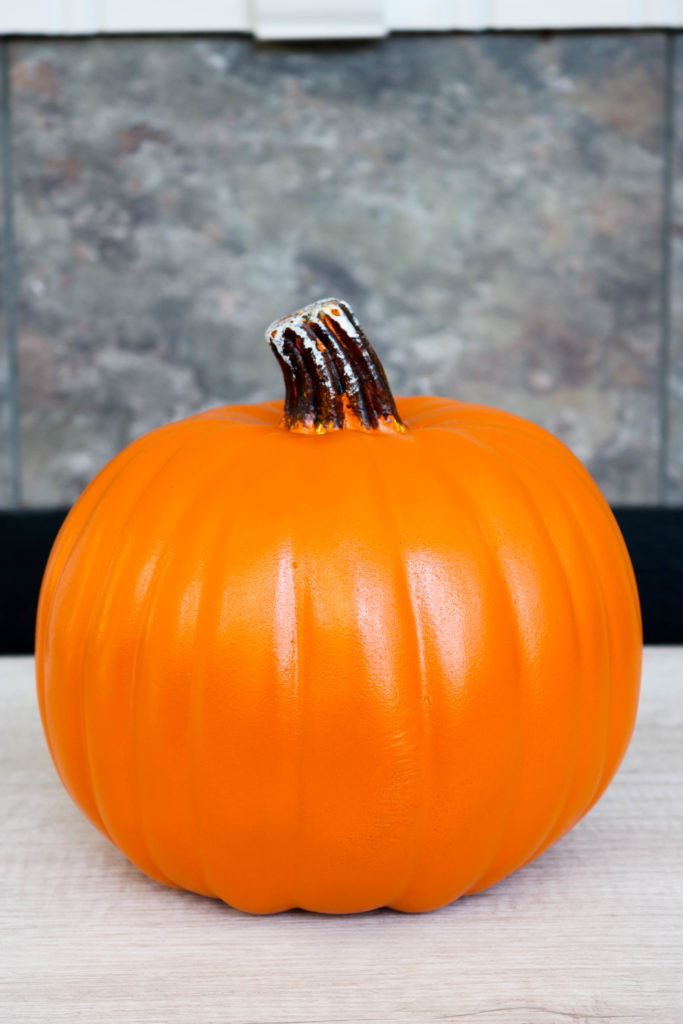
I bought a medium size pumpkin but to be honest, you can buy any size you want as long as it fits inside of the wreath you want to use and as long as you can find small pumpkins to use for the ears.
You only need half of this main pumpkin for the wreath. So you can get two wreaths from this one pumpkin 🙂
So, what I did was I just followed that seam right there that’s already on the pumpkin, using a knife to carefully cut it in half. About halfway through cutting the pumpkin in half it popped free and split perfectly in half.
I tried using a large sharp knife and a bread knife and I found that the bread knife cut the pumpkin a lot easier than the other.

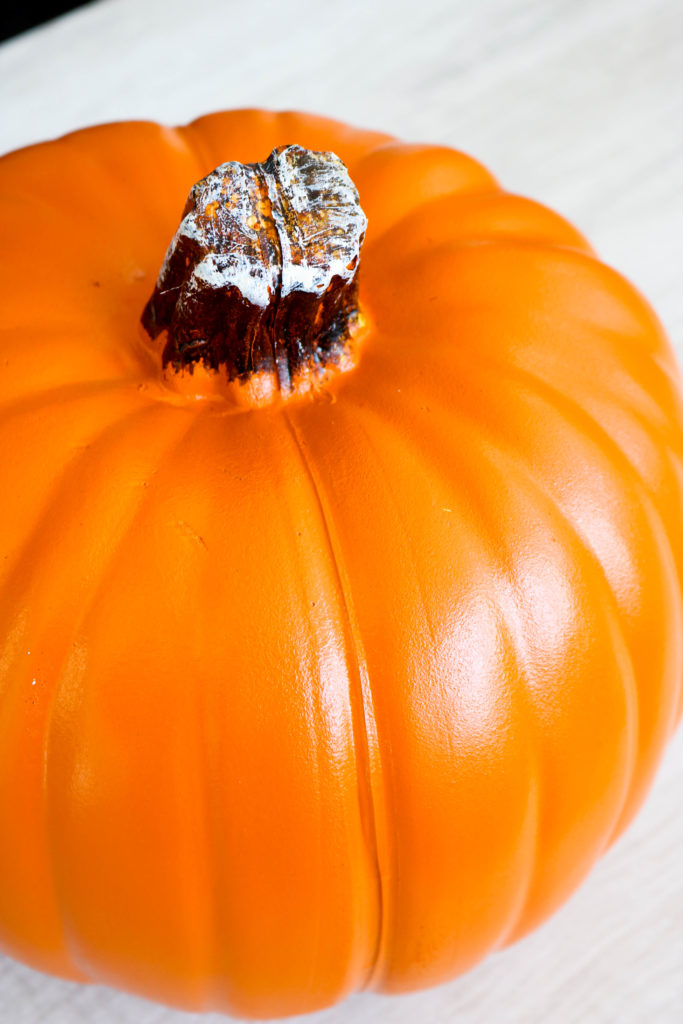
Once the pumpkin is slice in half, it’s time to work on the placement of the ears.
I grabbed these little pumpkins from Hobby Lobby too. They were in the fall section where all of the wreath making floral picks are. I seized them up with the main pumpkin in the store to make sure they were the right size.
They came with the pick in the bottom of them but I just removed it and stuck it through the side so that it would be easier to stick them into the main pumpkin.
Now let’s talk about this wreath.
When I was planning out this project I had originally wanted to make the wreath from scratch. Well, not from “scratch scratch” but I had planned on buying a grapevine wreath and then buying all of the leaves and fall acorn and berry floral picks to create my own wreath base.
I tried to find leaves at the Dollar Tree and had no luck, so back at Hobby Lobby I went around and gathered up everything I’d need to make a pretty fall wreath. After I got it all into my buggy, I added up everything and it came out to $27 before tax. The pretty fall wreaths were 50% at Hobby Lobby which made them $30 before tax.
So for $3 more dollars, I could by a pretty fall wreath that was already made, so that’s what I did. I actually bought two because I made two wreaths for his party.
So for the wreath part, you can make your own or buy one. It just didn’t make sense to me to save $3 and have to do the work when I had a little one to keep up with right now.
I also saw some pretty fall wreaths at Marshalls for about $20 and I’m sure other stores like Walmart and Target have them as well.
If you want to make your own, just buy a grapevine wreath that’s the right size for your main pumpkins, fake leaves and fall floral picks and hot glue the leaves and floral picks onto your grapevine wreath until you’re happy with how it looks.
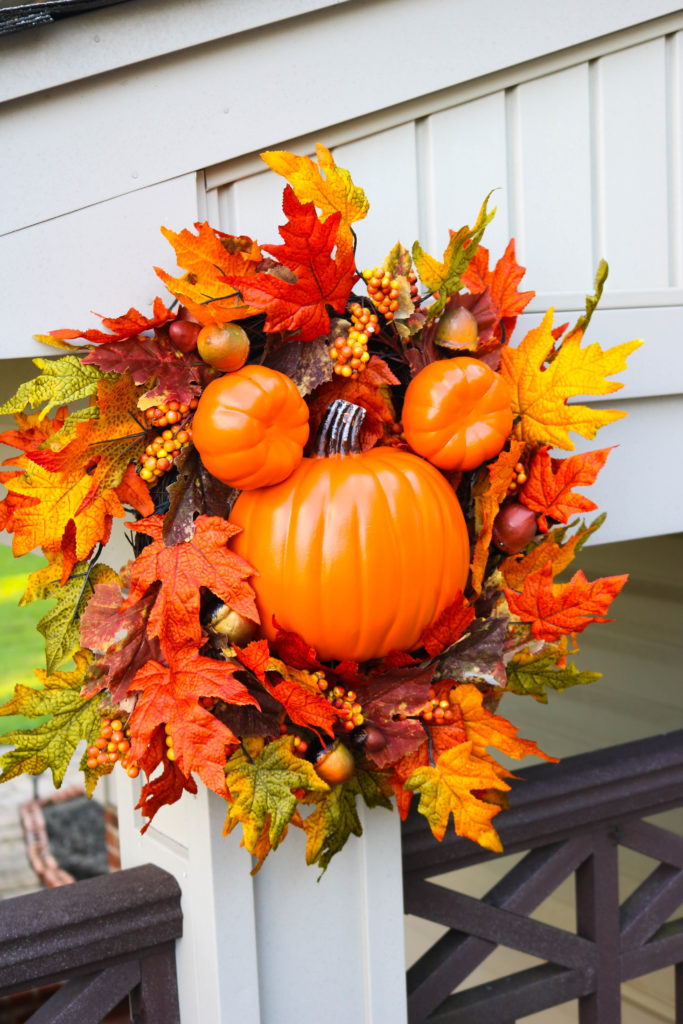
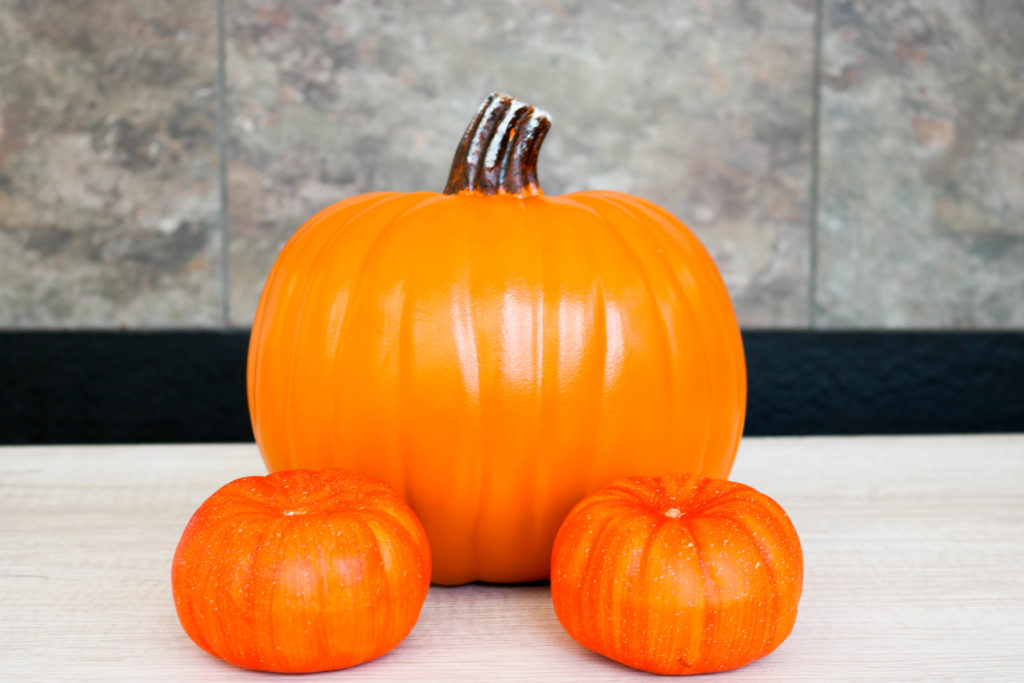
Now we have the cut main pumpkin, the little pumpkins and the wreath.
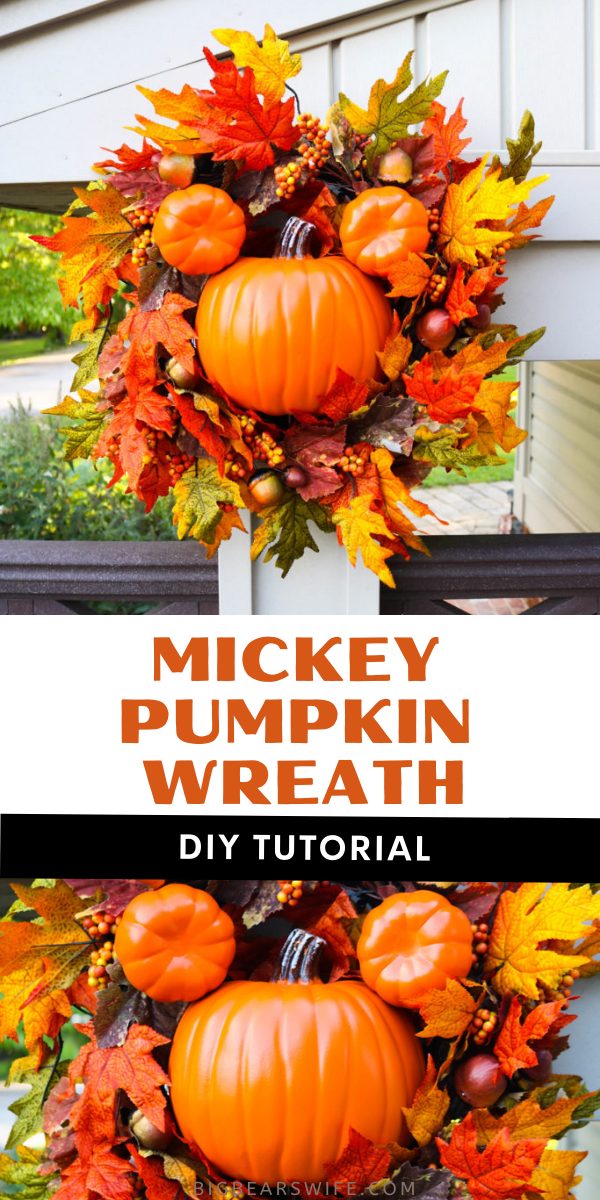
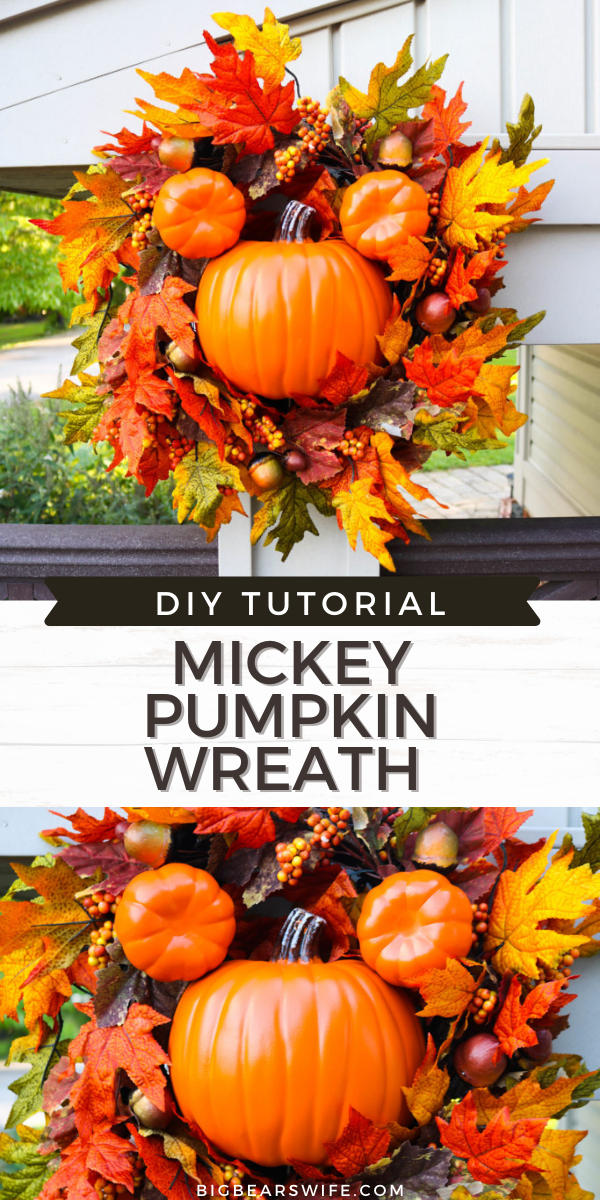
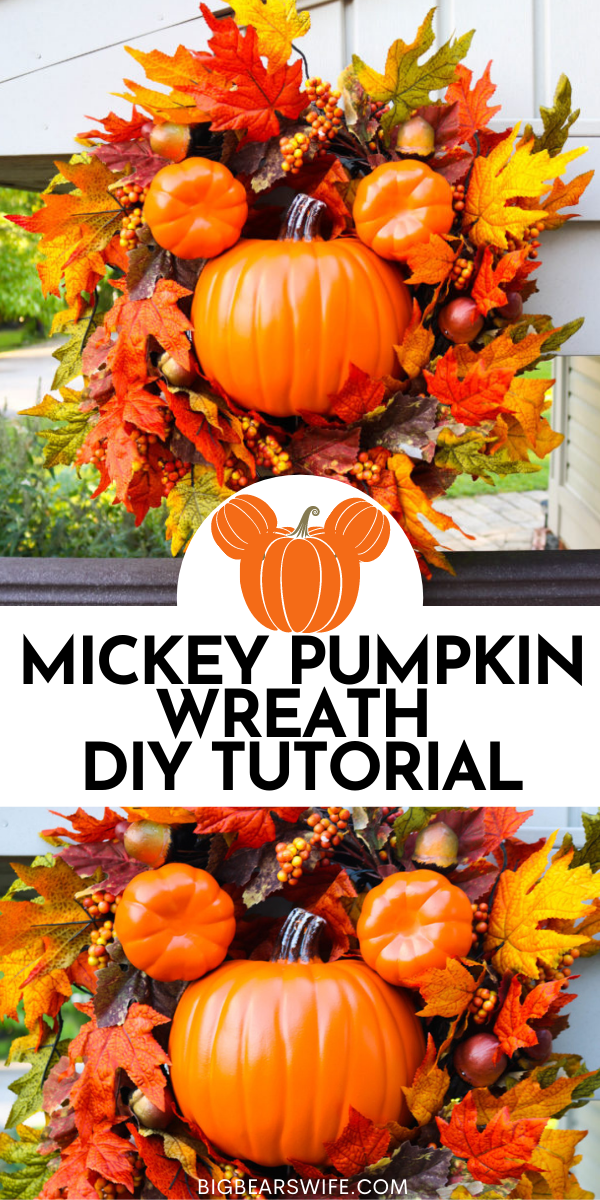
Lay the wreath on a flat surface and place the main pumpkin in the middle of the wreath. It should rest gently on the edges of the wreath. Place the little pumpkins where you want them on the main pumpkin.
Use the pick that came with little pumpkins to push through the main pumpkin to attach the little ears.
Now you have the holes where you need them and it’s time to paint.
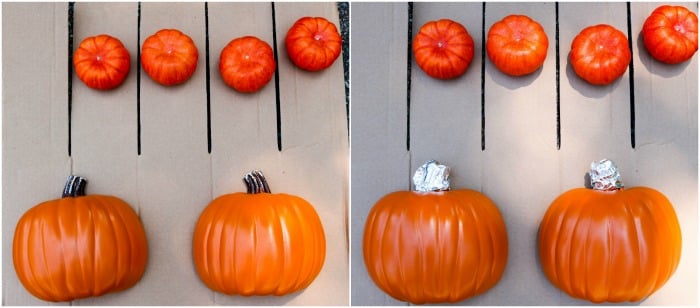
Cover the stems of the pumpkins before you paint. (I’ve got two big ones and 4 small ones because I made two wreaths)
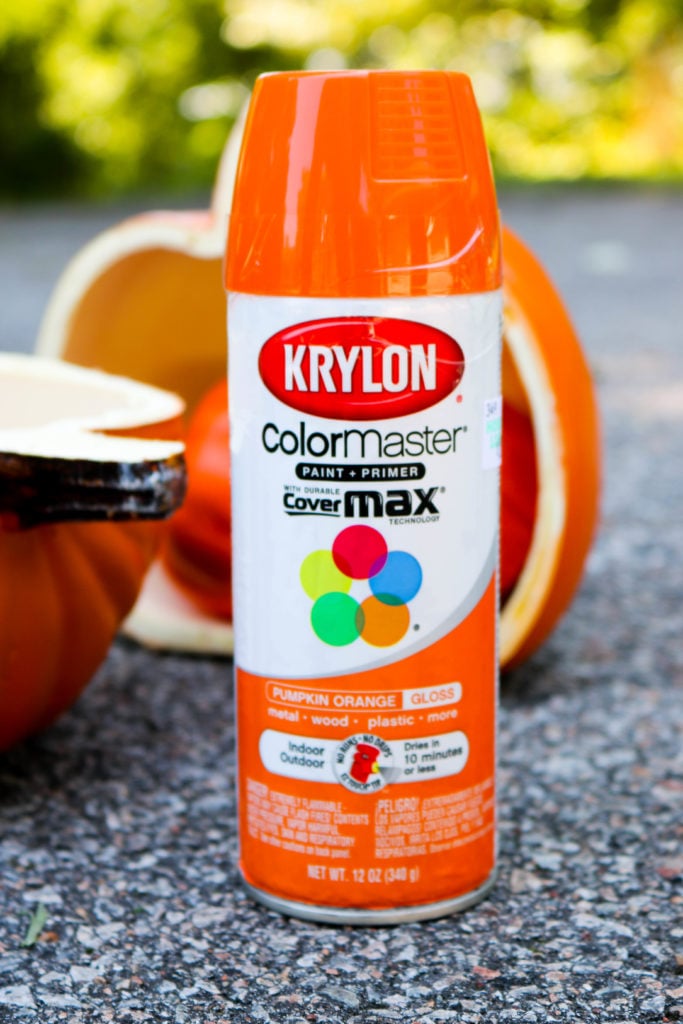
Outside or in a very well ventulated area, spray paint the pumpkins with a couple of coats of pumpkin orange paint.
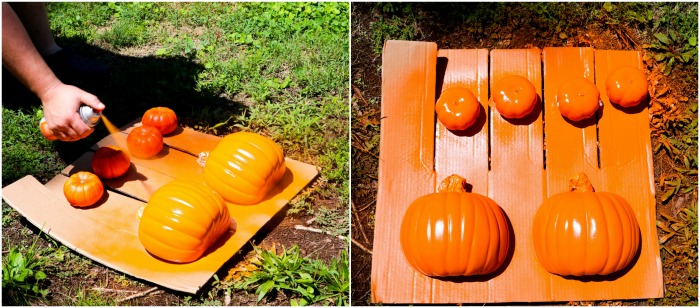
After they dry, spray them with a layer of the clear coating and let dry completely.
Now it’s time to put the wreath together.
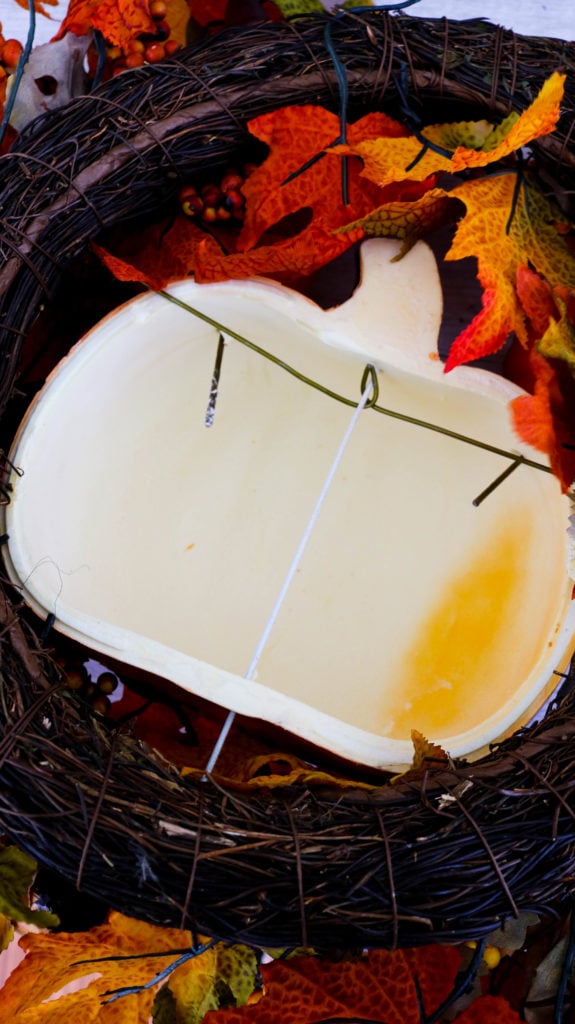
So while the main pumpkin did fit nicely into the wreath I wanted to make sure that it stayed put, especially since we were planning on using these outside.
So Thomas took a meal clothes hanger and cut it into three pieces, pushing one through the pumpkin into the bottom of the wreath and one piece through each side, twisting them to connect in the center.
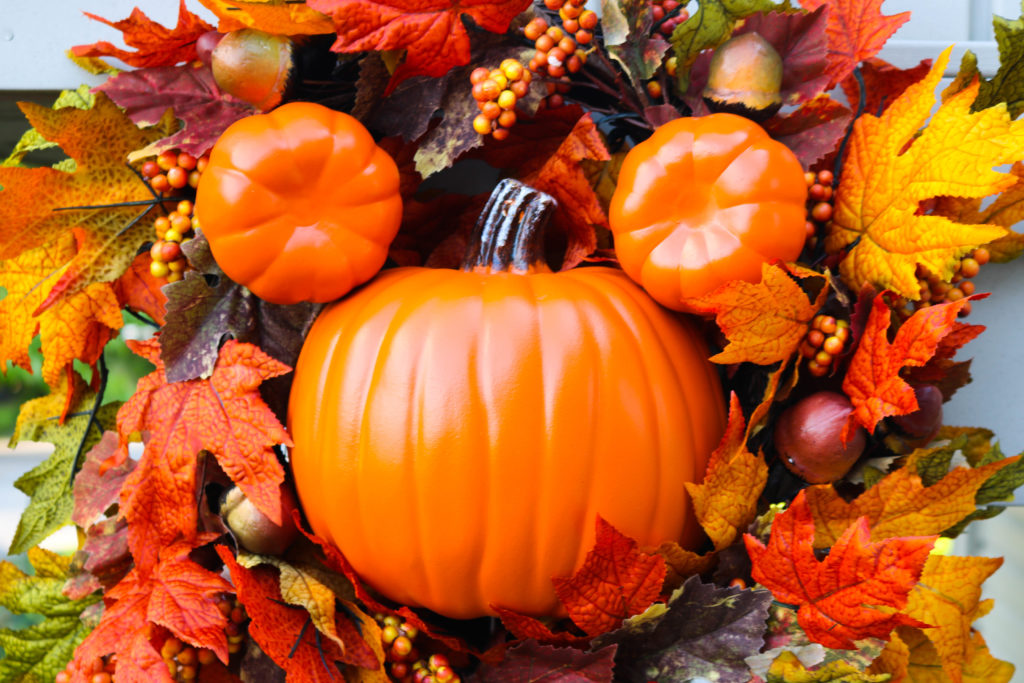
Then just place your ears onto the pumpkin, using the picks to secure them onto the main pumpkin. I also used a few dabs of hot glue to secure the ears a little extra tight.

YAY! You’re done and now you have your very own Mickey Pumpkin Wreath!
Look at my sweet little pumpkin with his Mickey Pumpkin wreath. Y’all, ooo this sweet face!

I’m thinking about writing another post about his Mickey Pumpkin birthday party so be on the look out for that.
Also, I may try to sell these at some point, maybe if I can find a wreath box to ship them. Whatcha think? Should I sell them?
Let me know if you make one! I’d love to see it!
![]()
If you make this wreath, snap a picture and share it on Instagram, Facebook or Twitter with the and hashtag #bigbearswife —
Mickey Pumpkin Wreath DIY Tutorial
Love it? Pin it!

A beautiful Fall wreath! Just what I needed to inspire me to get moving on my decor for Thanksgiving! Thank you!
I am definitely saving this for next year! The fall pumpkin Mickey wreaths are always my favorite.
Yes sell them!! So beautiful
Thank you!! I need to find some shipping boxes that are big enough for them.