• Skip to primary navigation
  • Skip to main content
  • Skip to primary sidebar
Big Bear's Wife

Big Bear's Wife

Easy Recipes, Fun Travels, & Real Life Southern Days

  • Home
  • About Me
    • Media/PR
    • Contact Me
  • Recipe Index
  • Subscribe
Big Bear's Wife
  • Facebook
  • Instagram
  • Pinterest
  • RSS
  • Twitter
  • Home
  • About Me
    • Media/PR
    • Contact Me
  • Recipe Index
  • Subscribe
  • Facebook
  • Instagram
  • Pinterest
  • RSS
  • Twitter
Home » Craft Ideas and Tutorials » How to make a Ribbon Wreath

How to make a Ribbon Wreath

May 8, 2012 *This post may include amazon links. As an Amazon Associate, I earn from qualifying purchases.

Pin
Share
Tweet
13965Shares
{  How to make a Ribbon Wreath  }

The deco-mesh and ribbon wreaths that are on display at some of the stores around here are just beautiful! I’ve always wanted one, but I just couldn’t afford the high price tag for them. In some of the stores around here, those wreaths can run anywhere from $90-$150, and I’m just to poor for that. Especially since I am always changing my mind on what I like. I’d hate to spend $100 on a wreath, just to be bored with it in a month.

My friend Jordan taught herself how to make the deco-mesh wreaths and the wreaths that she makes are just as beautiful as those ones in the stores. So when we were at Hobby Lobby a while back and she was picking up ribbon, so that she could teach herself how to make a ribbon wreath, I told her that she had to teach me too. We bought our ribbon and went back to her place to start crafting. After a few attempts of trying to figure out the best way to attach and lay the ribbon, we were on a roll.

I love how simple it is.

Click on the picture to enlarge it

I think I’ve made seven or so wreaths since then haha. I love them. Each one takes me about 30 minutes to make now.

function printDiv(e){var divToPrint=document.getElementById(e);newWin = window.open(“”, “printwin”); newWin.document.write(divToPrint.innerHTML); newWin.print(); newWin.close(); }

#therecipewiz {width:95%; padding:8px;} #therecipewiz{border:#E1E1E1 solid thin;}#therecipewiz #printbutton{float:right; cursor:pointer; margin:-8px 0px 0px 0px;} #therecipewiz #rechead img{float:left; margin:0px 8px 0px 0px;}#therecipewiz #recbody{padding:0px 30px 0px 30px;}#therecipewiz div.title{ font-size:18px; font-weight:bold; margin:5px 0px 1px 0px; padding:0px;}#therecipewiz div.byline{ font-size:12px;}#therecipewiz div.subtitle{ font-size:16px; font-weight:bold; margin:10px 0px 5px 0px;}#therecipewiz div.summary{font-style:italic; font-size:14px; margin:5px;}#therecipewiz .ingredient{ /*width:46%; float:left;*/ display:block; margin:5px 0px 5px 15px;}#therecipewiz .instruction{ margin:5px 0px 5px 15px; display:block;}#therecipewiz .time{ margin:5px 0px 5px 15px; display:block;}#therecipewiz .clear{clear:both}
(Printable Instructions Here) 
Ribbon Wreath Tutorial
by Angie Barrett May-8-2012
How to make a Ribbon Wreath
Materials:
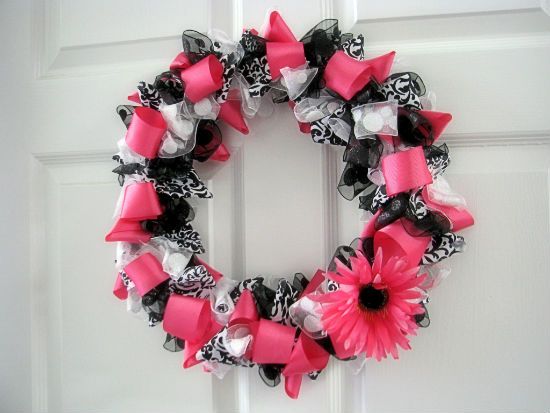
  • 1 (10inch-12inch) Styrofoam wreath
  • 1 pack straight pins
  • Scissors
  • 7 spools of thick ribbon (4 yards each)
  • *for mine I used*
  • 2 spools of Hot Pink Ribbon
  • 2 spools of Black and White Patterned Ribbon
  • 1 spool of Glittery White Ribbon
  • 1 spool of Glittery Black Ribbon
  • 1 spool of Solid White Ribbon
  • 1 Silk Flower (Optional)
Instructions
Take the solid white ribbon and wrap the styrofoam wreath, covering it completely. 
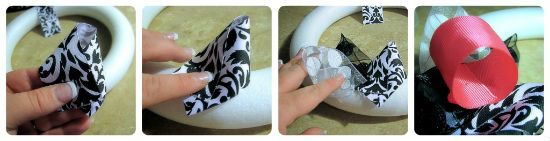
Next, cut the remaining ribbon into 4 inch segment. 
Taking one 4 inch ribbon segment at a time, loop the ribbon by placing one end the ribbon ontop of the other end of the ribbon, sort of in the shape of an “awareness ribbon”. 
Use 1 straight pin per ribbon loop. Place ribbon onto styrofoam wreath and secure with a pin where the ribbon crosses. 
Working in sections cover the wreath with and alternating ribbons. 
For the accent color loops around the wreath (the hot pink ones in my wreath) , take 12-14 segments of 4-inch ribbon and loop each one, into a circle. 
Secure each one to the wreath with a straight pin, going around the wreath, leaving about an 1 ½ inch space between each one. 
Cut stem from silk flower and stick into wreath.
Yield: 1

** This Ribbon Wreath Tutorial was also an article in our local Her Magazine, featured in the May 2012 Issue

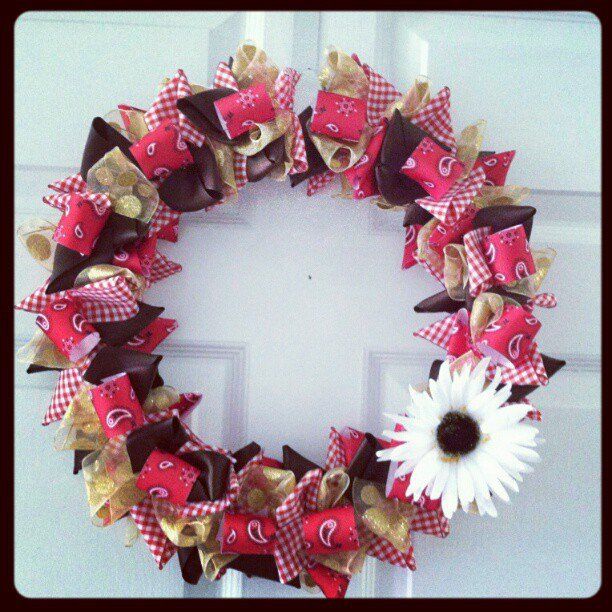
Here are a few others that I’ve made:

Pin
Share
Tweet
13965Shares
« Previous Post
BBQ Pulled Pork (for Sandwiches)
Next Post »
Cupcake Bouquet #cookformom #sundaysupper

Reader Interactions

Leave a Comment Cancel reply

Helpful comments include feedback on the post or changes you made.

Comments

  1. Paula Duncan Tarnaski says

    March 24, 2013 at 5:38 pm

    Beautiful!! Thanks for the tutorial!! I’m going to try my hand at these!

    Reply

Primary Sidebar

Meet Angie

I love the Farmer’s Market and Farm to Table meals but I’m also not ashamed to use canned vegetables and baking mixes. It’s all about balance! I’m so glad y’all are here!

More about Angie

Subscribe

Free Recipes, Free e-Books, and DIYs!

You have Successfully Subscribed!

Sign Up is FREE and you can unsubscribe at anytime.

Popular Posts

Instant Pot Short Ribs
Most Popular Recipes of 2017- We'll start from #10 and work our way all the way down to the #1 most popular recipe from 2017! These are the recipes that the most people visted over the year!  Starting at #10, these were the Top Recipes of 2017! Did you favorite make the list? 
Tape and Take Recipe

Copyright © 2009–2023 · Big Bear's Wife · Privacy Policy

Unauthorized use and/or duplication of this material without express and written permission from this blog’s author and/or owner is strictly prohibited.

DMCA.com Protection Status